Sooner or later, many of us need to process some numeric data in plain text format, be they system logs or sales totals, and to generate reports and charts out of those data. Scripts and utilities like gnuplot could be very useful in such cases, except when the results needs to be a normal spreadsheets with charts and formulas, which is both editable and compatible with people who only know how to deal with spreadsheets in office suites.
The standard solution in such cases is to import all the raw data in programs like Calc or Gnumeric, enter by hand all the related formulas, generate charts, format everything to taste and email the result to whoever needs it. This is perfectly acceptable if it’s a one-time task, but what if your boss demands a new version of that spreadsheet, with fresh data, every day?
Luckily, the flexibility and openness of ODF make tasks like this very easy. There is no reason to suffer and waste time with such chores only because somebody wants a “real”, editable spreadsheet with plenty of nice charts. If your raw data and the layout of the required spreadsheet have a constant structure, it only takes a bit of shell and Perl scripting to generate automatically a new ODF spreadsheet with the same layout whenever the raw data change.
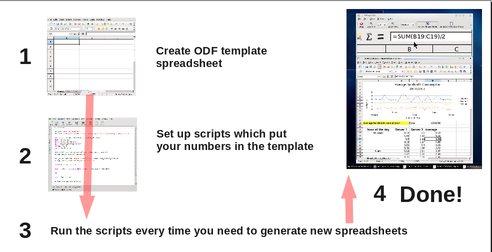
The general procedure, shown in the diagram, is explained in Why and how the OpenDocument format can save you a lot of time! and works even with data that aren’t stored in some database, or when you must change text, not just numbers.
What’s inside an OpenDocument spreadsheet
An ODF spreadsheet is just a compressed zip archive. The actual data are in a file called content.xml. Each sheet is a two dimensional table (whose cells contain numbers, strings or formulas) inside that file.
Each row in those tables is an element called "<table:table-row>". Single cells are marked as "<table:table-cell>". The actual value of a number is stored in two cell attributes called "office:value-type" and "office:value"; formulas, instead, are inside “table:formula” attributes. Cell ranges are defined with square brackets, like "[.B17:.D19]".
Objects live in a folder called… Objects, which contains sub-folders called “Object 1”, “Object 2” and so on. Each chart of an ODF spreadsheet is stored as a "<draw:object>" element written into the content.xml file of its own “Object n” sub-folder. More exactly, inside this second file a chart has some attributes specifying its appearance plus one XML element called "<table:table>" which contains a copy, in a slightly different format, of all the cells related to the chart. It is this copy which is used by ODF applications to do the actual drawing.
Practical example: average bandwidth consumption
_(note: all the scripts and .ods files mentioned below are here)_.
Let’s assume that your raw data are the bandwidth consumption of two servers, calculated every hour over the last 24 hours. They may come to you from a script, a database or via email. This doesn’t matter, as long as the format is constant. In this example we have ASCII files made of 24 lines text divided in three columns separated by tabs: a time-of-day label plus server 1 and server 2 bandwidths in MBit/sec:
Time-of-day     BW 1   BW2
  Midnight        4.5    6.4
                  6.3    6.3
                  3.1    6.1
                  1.85   5.87
                  etc...
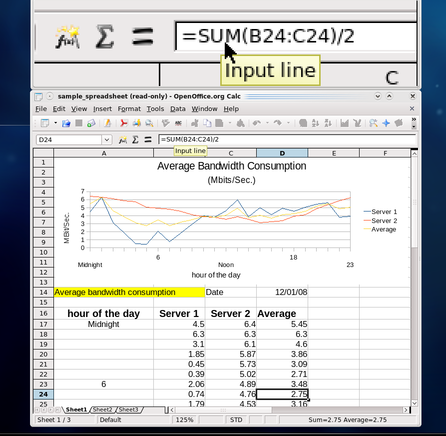
What the boss, instead, wants first thing every morning, is a nice spreadsheet like this, which also calculates the average bandwidth consumption in each hour and plots it.
The first thing to do is to unzip the .ods file. Inside it, we’ll find all those numbers in two distinct places, as explained above. Using the data of Listing 1, the XML code (inside the content.xml file) for row 17 of the spreadsheet shown in the picture would look like this (note the formula at the end):
  Listing 2:
  <table:table-row table:style-name="ro1"><table:table-cell office:value-type="string"><text:p>Midnight</text:p></table:table-cell><table:table-cell office:value-type="float" office:value="4.5"><text:p>4.5</text:p></table:table-cell><table:table-cell office:value-type="float" office:value="6.4"><text:p>6.4</text:p></table:table-cell><table:table-cell table:formula="oooc:=SUM(B17:C17)/2"/></table:table-row>
This, instead, would be the XML source for the first three points of the three lines in the chart and their label, inside “Object 1/content.xml”:
Listing 3:
table:table-row
Yes, it’s terribly verbose but it’s plain text, isn’t it? Therefore, obtaining a spreadsheet with the same layout but updated charts and formula results from different raw data is just a matter of replacing all the strings of the XML rows above with other strings which contain the new raw numbers. In order to do this, we need to transform those XML files into a spredsheet template. To prepare it, execute these commands to unpack the spreadsheet:
  Listing 4:
  #> mkdir temp
  #> cp sample_spreadsheet.ods temp/sample.zip
  #> cd temp
  #> unzip sample.zip
  #> ls -l
  content.xml
  Object 1/content.xml
  ObjectReplacements/Object 1
  ...other files omitted for brevity
  #> rm "ObjectReplacements/Object 1"
The file “ObjectReplacements/Object 1” is a binary version of the chart, created when the file was last saved. It is also what OpenOffice would display by default if you reopened the file, until you forced the application to redraw the chart by changing the value of some cell. It’s necessary to remove it from the template, otherwise, no matter what data are in the new spreadsheet, you’d see the original drawing until you updated some cell.
In general, the trasformation of the two content.xml files in templates is simple, no matter how complex the table or the chart are. Open them in any text editor, locate all the table rows (those of Listing 2 and 3) and replace them with one placeholder string. After that, the main file should look like Listing 5 and “Object 1/content.xml” should become similar to Listing 6:
  Listing 5:
  ...lots of XML elements...
  </table:table-row>MY_DATA_GO_HERE</table:table>
  ...lots of other XML elements...

  Listing 6
  ...lots of XML elements...
  <table:table-rows>MY_CHART_GOES_HERE</table:table-rows>
  ...lots of other XML elements...
Just be very careful to cancel only the row elements and nothing else, otherwise you’ll corrupt the template. Once you’re finished, save everything in a tar file called ods_bw_template.tar. Remember, this isn’t a valid ODF file anymore, just a template, that’s why you shouldn’t use the .ods extension.
The actual scripts
The generation of other spreadsheets with new data happens by means of the scripts in Listing 8, ods_gen.pl. Instead of running it directly though, we use it inside the shell wrapper called ods_gen.sh shown in Listing 7, which I’ll explain first. ods_gen.sh takes two parameters:
# ods_gen.sh raw_data_1.txt ods_bw_template.tar
which are a raw data file with the format of Listing 1 and, respectively, the template. After copying them in the temporary folder tmp_ods_gen and expanding the tar archive (lines 6 to 11), ods_gen.sh calls ods_gen.pl two times. The first (line 13) creates a new main content.xml file (hence the “main” argument”). Then the same script, called with the “chart” option in line 16, updates the other content.xml file, the one used to draw the chart. The final part, from line 19 to the end, is just housekeeping: remove all temporary files, zip everything else and save it as $ODS_NAME.ods
  Listing 7: ods_gen.sh
       1  #! /bin/bash
       2
       3  ODS_NAME=`date '+%Y%m%d%H%M'`
       4  ODS_SCRIPT='/home/marco/bin/ods_gen.pl'
       5
       6  echo Loading $1 into $ODS_NAME.ods with template $2
       7  mkdir tmp_ods_gen
       8  cp $1 tmp_ods_gen/data.txt
       9  cp $2 tmp_ods_gen/template.tar
      10  cd tmp_ods_gen
      11  tar xf template.tar
      12
      13  $ODS_SCRIPT data.txt content.xml main > tmp_content_main.xml
      14  mv tmp_content_main.xml content.xml
      15
      16  $ODS_SCRIPT data.txt 'Object 1/content.xml' chart > tmp_content_chart.xml
      17  mv tmp_content_chart.xml 'Object 1/content.xml'
      18
      19  rm template.tar data.txt
      20
      21  find . -type f -print0 | xargs -0 zip ../$ODS_NAME > /dev/null
      22
      23  cd ..
      24
      25  rm -rf tmp_ods_gen
      26
      27  mv $ODS_NAME.zip $ODS_NAME.ods
As I anticipated, the real work happens inside the ods_gen.pl script of Listing 8:
  Listing 8: ods_gen.pl

       1  #! /usr/bin/perl
       2
       3  use strict;
       4  my $TABLE_DATA = '';
       5  my $CURRENT_ROW = '';
       6  my $CURRENT_FORMULA = '';
       7
       8  ################################
       9  #
      10 # Spreadsheet-dependant variables
      11
      12 my $ODS_MAIN_ROW_TEMPLATE= <<"END_MAIN_ROW_TEMPLATE";
      13 <table:table-row table:style-name="ro1"><table:table-cell office:value-type="string"><text:p>MY_LABEL_STRING</text:p></table:table-cell><table:table-cell office:value-type="float" office:value="MY_FIRST_NUMBER"><text:p>MY_FIRST_NUMBER</text:p></table:table-cell><table:table-cell office:value-type="float" office:value="MY_SECOND_NUMBER"><text:p>MY_SECOND_NUMBER</text:p></table:table-cell><table:table-cell table:formula="oooc:=MY_ODS_FORMULA"/></table:table-row>
      14  END_MAIN_ROW_TEMPLATE
      15
      16  my $ODS_CHART_ROW_TEMPLATE= <<"END_CHART_ROW_TEMPLATE";
      17  <table:table-row><table:table-cell office:value-type="string"><text:p>MY_LABEL_STRING</text:p></table:table-cell><table:table-cell office:value-type="float" office:value="MY_FIRST_NUMBER"><text:p>MY_FIRST_NUMBER</text:p></table:table-cell><table:table-cell office:value-type="float" office:value="MY_SECOND_NUMBER"><text:p>MY_SECOND_NUMBER</text:p></table:table-cell><table:table-cell office:value-type="float" office:value="MY_ODS_FORMULA"><text:p>MY_ODS_FORMULA</text:p></table:table-cell></table:table-row>
      18  END_CHART_ROW_TEMPLATE
      19
      20  my $ODS_FORMULA    = 'SUM([.RANGE_START:.RANGE_END])/2';
      21  my $START_COLUMN   = 'B';
      22  my $END_COLUMN     = 'C';
      23  my $CURRENT_ROW_ID = 17;
      24
      25  ######################################################################
      26
      27  die "No correct operation specified!n" if (($ARGV[2] ne 'main') &&
      28    ($ARGV[2] ne 'chart'));
      29
      30  open(DATA, "< $ARGV[0]") || die "could not open data file $ARGV[0]n";
      31
      32  while (<DATA>) {
      33    chomp;
      34    my ($STRING, $NUM_1, $NUM_2) = split /t/;
      35
      36    if ($ARGV[2] eq 'main') {
      37       $CURRENT_ROW     = $ODS_MAIN_ROW_TEMPLATE;
      38       $CURRENT_FORMULA = $ODS_FORMULA;
      39       $CURRENT_FORMULA =~ s/RANGE_START/$START_COLUMN$CURRENT_ROW_ID/;
      40       $CURRENT_FORMULA =~ s/RANGE_END/$END_COLUMN$CURRENT_ROW_ID/;
      41       $CURRENT_ROW_ID++;
      42    }
      43    if ($ARGV[2] eq 'chart') {
      44       $CURRENT_ROW = $ODS_CHART_ROW_TEMPLATE;
      45       # Change next line to match your own $ODS_FORMULA!!
      46       $CURRENT_FORMULA = sprintf("%10.2f", ($NUM_1 + $NUM_2)/2);
      47       $CURRENT_FORMULA =~ s/s*//g;
      48    }
      49    chomp $CURRENT_ROW;
      50    $CURRENT_ROW =~ s/MY_LABEL_STRING/$STRING/g;
      51    $CURRENT_ROW =~ s/MY_FIRST_NUMBER/$NUM_1/g;
      52    $CURRENT_ROW =~ s/MY_SECOND_NUMBER/$NUM_2/g;
      53    $CURRENT_ROW =~ s/MY_ODS_FORMULA/$CURRENT_FORMULA/g;
      54    $TABLE_DATA .= $CURRENT_ROW;
      55  }
      56  close DATA;
      57
      58  undef $/;
      59  open(XML_TEMPLATE_FILE, "< $ARGV[1]") || die "could not open content XML template $ARGV[1]n";
      60  my $XML_TEMPLATE = <XML_TEMPLATE_FILE>;
      61  close XML_TEMPLATE_FILE;
      62
      63  $XML_TEMPLATE =~ s/MY_DATA_GO_HERE/$TABLE_DATA/ if ($ARGV[2] eq 'main');
      64  $XML_TEMPLATE =~ s/MY_CHART_GOES_HERE/$TABLE_DATA/ if ($ARGV[2] eq 'chart');
      65  print $XML_TEMPLATE;
      66  exit;
The important part starts at line 12, after the initialization of some auxiliary variables: set them according to your needs. $ODS_MAIN_ROW_TEMPLATE and $ODS_CHART_ROW_TEMPLATE are the parts from content.xml and, respectively, “Object 1/content.xml” already shown in Listings 2 and 3. The only change to do is to replace numbers and formulas with the strings MY_LABEL_STRING, MY_FIRST_NUMBER, MY_SECOND_NUMBER and MY_ODS_FORMULA in the proper places. If you want to modify this script to generate spreadsheets with a different layout, this is where you must start: create your template, open it as explained above and copy a complete table row from each file in these two variables.
Lines 20 and 46 are equally important: make sure they are consistant with each other because that’s where you define your formula, first in ODF and then in Perl format. The value in line 20 contains two placeholders, RANGE_START and RANGE_END, because the actual cell addresses are substituted later on, in lines 39 and 40, using the starting values defined in lines 21 to 23.
In lines 30 to 34 the script reads the raw data file one row at a time, loading the values from the three columns in $STRING, $NUM_1 and $NUM_2.
When ods_gen.pl creates the new XML code, numbers can just go in as they are, but formulas need a little extra processing. If we are generating the main content.xml file, then we have to rebuild the original formulas with their absolute cell addresses, which is just what happens in lines 38 to 40. If we are creating the chart XML file instead, we have to calculate the numeric result of the formula (lines 46 and 47).
In both cases the variable $CURRENT_ROW is pre-loaded in lines 37 or 44 with the template variable corresponding to the kind of file we need to generate (‘main’ or ‘chart’). Finally, in lines 50 to 54 we perform all the substitution and add the row to $TABLE_DATA.
After closing the data file, we dump inside the $XML_TEMPLATE variable all the content of the XML file passed as second parameter, put the $TABLE_DATA in place of the MY_DATA_GO_HERE or MY_CHART_GOES_HERE variables and write everything to standard output.
That’s it, really. Once the scripts are ready, you can automatically generate as many versions of the initial reference spreadsheets as you like by just running the scripts with a different data set.
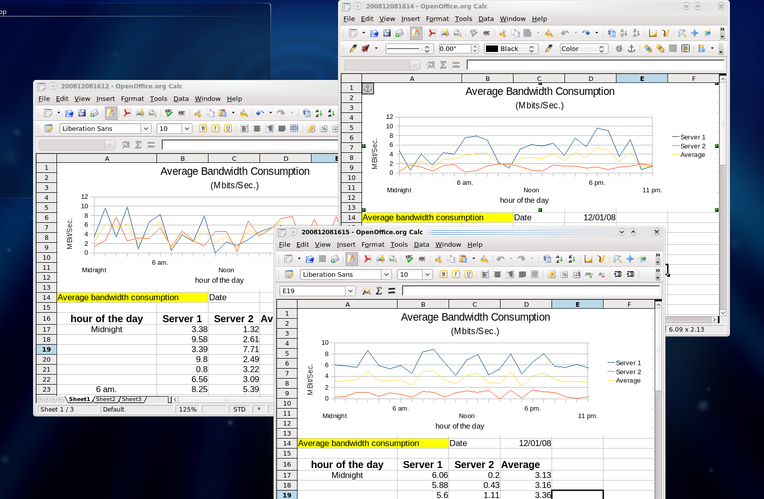

The results, as shown in the last two pictures, will be each time a different but 100% valid ODF spreadsheet with different data and charts (left picture) and the same editable formulas.
Pros and cons of this method
- Pros
- all the formatting and layout work happens just once, quickly, in a graphical interface and only if you do have to create the reference spreadsheet from scratch.
- the final result is editable or embeddable in other spreadsheet without programming
- The two scripts explained here are less than 100 lines of code together and only need bash and Perl: they will work practically everywhere, even if OpenOffice isn’t available and/or you can’t install XML libraries or other utilities.
- Cons
- less scalable, elegant and flexible that doing the same things with real ODF/XML tools (cfr the first article of this series) or LaTeX
- (in extreme cases) accuracy.Lines 20 of Listing 3 calculates the numbers that OpenOffice displays in the cells of column D. Line 46 of the same listing substitutes MY_ODS_FORMULA inside “Object 1/content.xml” with the numbers that OpenOffice uses as Y-axis values when drawing the yellow line of the chart. Theoretically, when dealing with complex floating point math, some numbers in the first set may not be mathematically equal to their counterparts in the second set. The difference, if any, is surely negligible in the example here and most real world scenarios, but it doesn’t hurt to be aware of the issue.
(the content of this page is based on an article originally written for Linux Format)