Slideshows are extremely popular as presentation and educational tools, but have a couple of serious problems. The first is readability: let’s admit it, many slideshows are almost unusable. One of the secrets to useful slideshows is terseness. Each slide should contain only a few short points or pictures which summarize the key concepts you want to transmit to the audience with that part of your talk.
The other big issue with slideshows is that GUI presentation software, be it PowerPoint, OpenOffice Impress, KPresenter or anything else, can be quite time-consuming and distracting, no matter how you use it. Writing bullets and sub bullets as simple text outlines is much faster, even when you’re just pasting together notes you scrabbled on your PDA, email fragments, quotes from Web pages or thoughts of the moment.
If you need to produce slideshows and think that the cleaner they are the better, but don’t like the time it takes to put them together in a GUI, here’s a solution. Like any other ODF document, OpenDocument slideshows are very easy to generate and process automatically. Besides, using the approach below instead of LaTex and friends has one big advantage: the end result is a file that you can pass around to everybody, including users who can only handle traditional office suites and maybe need to edit the slides, but wouldn’t touch any manual markup with a ten feet pole.
This said, there is one big difference between this kind of slideshow processing and the tricks in my other articles on ODF scripting: you will probably need to fix something manually, unless you improve the scripts found here or all your slides can always have the same fixed number of bullet points, each with the same, more or less constant number of words. It’s practically impossible for a few quick scripts to make all slides look good without some manual tweaking here and there. Even in this case, however, the whole process may still take much less than typing by hand the content of all the slides in Impress.
Practical example of automatically generated ODF slideshow
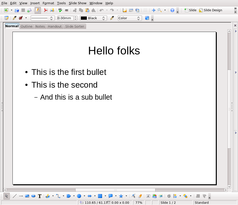
Here’s what I’m talking about. This picture shows the initial template:

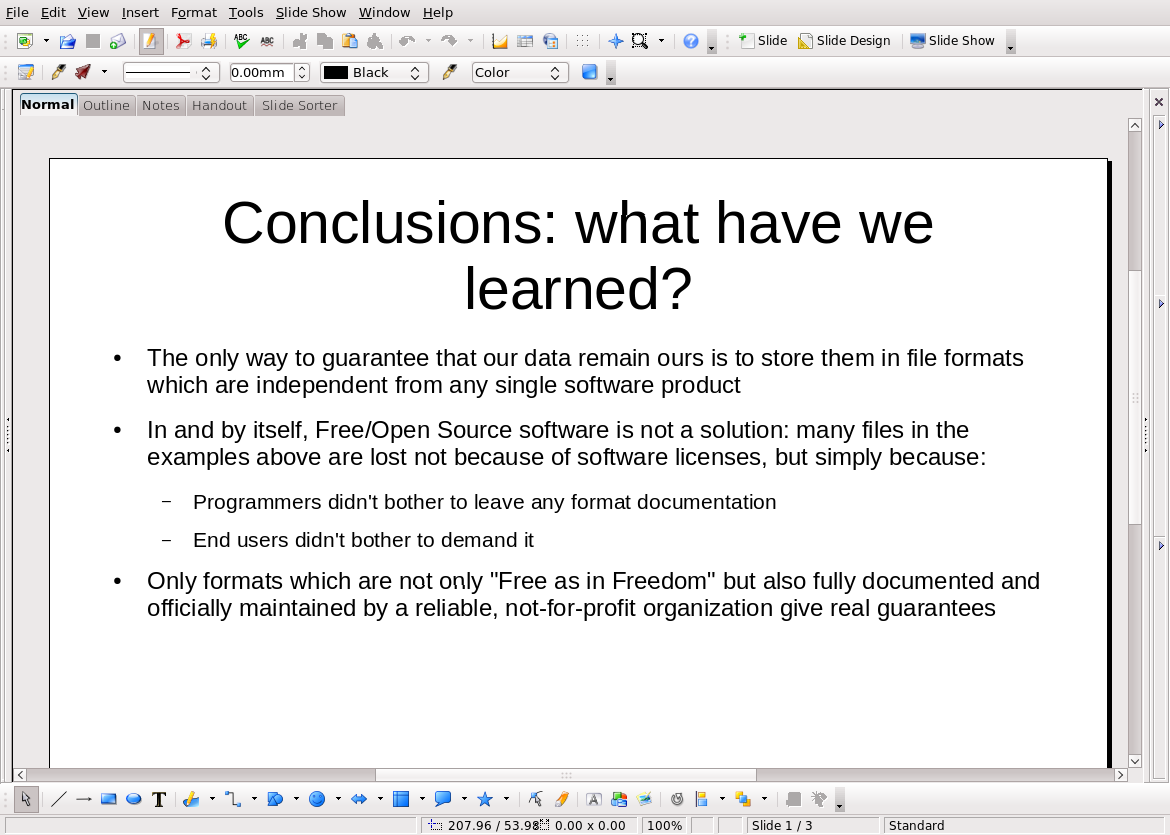
This, instead, shows the result:

that is the filled slide you’ll get by running the scripts explained below on this plain text source (shameless self promotion: these are the conclusions of my essay on Why Open Digital Standards Matter in Government):
  ==Conclusions: what have we learned?==

  - The only way to guarantee that our data remain ours is to store them in file formats which are independent from any single software product
  - In and by itself, Free/Open Source software is not a solution: many files in the examples above are lost not because of software licenses, but simply because:
   - Programmers didn't bother to leave any format documentation
   - End users didn't bother to demand it
  - Only formats which are not only "Free as in Freedom" but also fully documented and officially maintained by a reliable, not-for-profit organization give real guarantees
The markup of this outline is the txt2tags format: lines which start and end with one or more “=” characters are headings. A dash as first character of a line indicates a list item, or a sub-list one if preceded by a white space. Much faster than working with the mouse, isn’t it? Personally I use txt2tags because it only consists of one very simple Python script which can convert outlines to many formats, from HTML to Pdf (via LaTeX) and MediaWiki. This said, it’s quite easy to convert the scripts which follow to recognize other markup systems.
The initial ODF template is the simplest possible one: only one type of slide, that only contains text in two levels of bullet points, on a bare background. The reason is to present the basic, very general trick, with one simple but complete example. Once you understand the basic concept, however, expanding it is pretty simple, even if you want to include images, and you can use whatever template you like.
ODF slideshow generator: preparing the template
Let’s now see the preparation work you need to do (but only once) and the actual scripts that automatically convert plain text to projector-ready slideshow. To download all the templates and scripts mentioned in this page, click here.
The first thing to do is to create with OpenOffice impress a single slide presentation with your sample layout, and save it in ODF format. Next, you have to unzip the resulting .odp file, modify with any text editor its content.xml file as described below and then zip everything again with the name template.zip.
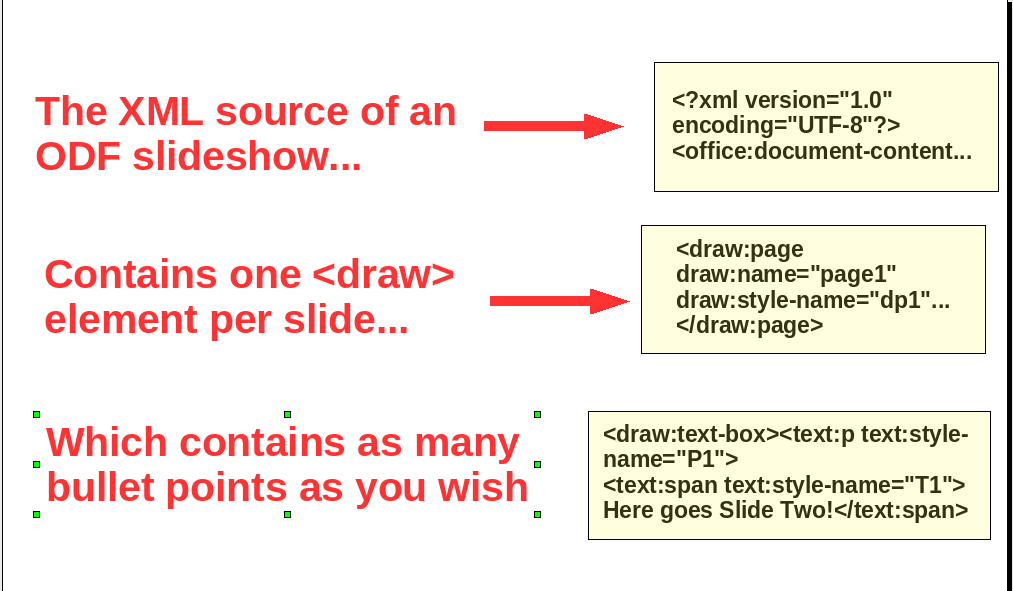
You need to mess with the content.xml file for two reasons. The first is to copy into separate files the XML code corresponding to its bullet and sub-bullet and slide sections, recognizable from the tags shown in this picture:

The second is to open those files to replace slide number, title and the XML code you remove with special text strings, like **MY_SLIDES_GO_HERE**, which the scripts can recognize and replace with your content. If this looks boring, it is, but remember that it’s a one-time-only work.
ODF slideshow generator: here are the scripts
There are two scripts that you need to use for generating ODF slideshows. The first is a Bash one which manages all the files involved in the process, and then calls a Perl one that actually creates the new content of the slideshow by reading the text outline. If you need to use a different template you only need to modify that second script.
The Bash script, called odp_gen.sh and shown below, takes four arguments: the text outline, two XML templates (one for the single page, one for the whole content) and the zipped version of the reference OpenDocument slideshow:
  odp_gen.sh

   1  #! /bin/bash
   2  #syntax: odp_gen.sh outline slide slideshow template
   3
   4  ODP_NAME=`date '+%Y%m%d%H%M'`
   5  ODP_SCRIPT='/usr/local/bin/odp_gen.pl'
   6
   7  mkdir tmp_odp_gen
   8  cp $1 tmp_odp_gen/outline.txt
   9  cp $2 tmp_odp_gen/slide.xml
   10 cp $3 tmp_odp_gen/slideshow.xml
   11 cp $4 tmp_odp_gen/template.zip
   12 cd tmp_odp_gen
   13
   14 unzip template.zip >& /dev/null
   15 rm    content.xml
   16
   17 $ODP_SCRIPT outline.txt slide.xml slideshow.xml > content.xml
   18
   19 rm outline.txt slide.xml slideshow.xml template.zip
   20 find . -type f -print0 | xargs -0 zip ../$ODP_NAME > /dev/null
   21
   22 cd ..
   23 rm -rf tmp_odp_gen
   24 mv $ODP_NAME.zip $ODP_NAME.odp
It first creates a temporary folder (line 7) and then copies into it all the files received as arguments (lines 8⁄12). After expanding the zip archive and removing the original content.xml files, it runs odp_gen.pl to create a new one with the text taken from the outline (lines 14⁄17). Once we have that file, it’s just a matter of removing all the temporary files, zipping together whatever is left and rename it with the .odp extension (lines 19⁄24). Important: for a cleaner way to zip/unzip ODF files see the comments here.
Let’s now look inside the script which actually creates the new slideshow, odp_extractor.pl:
  odp_extractor.pl

     1  #! /usr/bin/perl
     2
     3  use strict;
     4
     5  my $XML_SLIDE_TEMPLATE;
     6  my $XML_SLIDESHOW_TEMPLATE;
     7  my $CURRENT_SLIDE_NUMBER = 0;
     8  my $SLIDE_TEXT = '';
     9  my $SLIDESHOW_TEXT = '';
    10  my $SLIDE_TITLE = '';
    11  ###############################################
    12
    13  my $ODP_BULLET_POINT= <<"END_ODP_BULLET_POINT";
    14  <text:list text:style-name="L2"><text:list-item><text:p text:style-name="P3"><text:span text:style-name="T1">__BULLET_TEXT_HERE__</text:span></text:p></text:list-item></text:list>
    15  END_ODP_BULLET_POINT
    16
    17  my $ODP_SUB_BULLET_POINT= <<"END_ODP_SUB_BULLET_POINT";
    18  <text:list text:style-name="L2"><text:list-item><text:list><text:list-item><text:p text:style-name="P4"><text:span text:style-name="T1">__SUB_BULLET_TEXT_HERE__</text:span></text:p></text:list-item></text:list></text:list-item></text:list>
    19  END_ODP_SUB_BULLET_POINT
    20
    21 ################################################
    22
    23  open(XML_SLIDE, "< $ARGV[1]") || die "could not open page template $ARGV[0]n";
    24
    25  while (<XML_SLIDE>) {
    26      $XML_SLIDE_TEMPLATE .= $_;
    27  }
    28
    29  close XML_SLIDE;
    30
    31  open(TEXT_OUTLINE, "< $ARGV[0]") || die "could not open text outline $ARGV[1]n";
    32
    33  while (<TEXT_OUTLINE>) {
    34      chomp;
    35      if ($_ =~ m/^==(.*)==$/) {          # a new slide starts
    36      if ($CURRENT_SLIDE_NUMBER > 0) { #format the previous page
    37          my $CURRENT_SLIDE = $XML_SLIDE_TEMPLATE;
    38          $CURRENT_SLIDE =~ s/__SLIDE_NUMBER__/$CURRENT_SLIDE_NUMBER/g;
    39          $CURRENT_SLIDE =~ s/__SLIDE_TITLE_GOES_HERE__/$SLIDE_TITLE/g;
    40          $CURRENT_SLIDE =~ s/__SLIDE_TEXT_GOES_HERE__/$SLIDE_TEXT/;
    41          $SLIDESHOW_TEXT .= $CURRENT_SLIDE;
    42          $CURRENT_SLIDE = '';
    43          $SLIDE_TEXT = '';
    44      }
    45      $SLIDE_TITLE = $1;
    46      print STDERR "$CURRENT_SLIDE_NUMBER TITLE: $SLIDE_TITLE;n";
    47      $CURRENT_SLIDE_NUMBER++;
    48      }
    49
    50      if ($_ =~ m/^- (.*)$/) { # bullet point
    51      my $CURRENT_BULLET_TEXT = $1;
    52      my $CURRENT_BULLET_POINT = $ODP_BULLET_POINT;
    53      $CURRENT_BULLET_POINT =~ s/__BULLET_TEXT_HERE__/$CURRENT_BULLET_TEXT/;
    54      $SLIDE_TEXT .= $CURRENT_BULLET_POINT;
    55      }
    56
    57      if ($_ =~ m/^ - (.*)$/) { # sub-bullet point
    58      my $CURRENT_SUB_BULLET_TEXT = $1;
    59      my $CURRENT_SUB_BULLET_POINT = $ODP_SUB_BULLET_POINT;
    60      $CURRENT_SUB_BULLET_POINT =~ s/__SUB_BULLET_TEXT_HERE__/$CURRENT_SUB_BULLET_TEXT/;
    61      $SLIDE_TEXT .= $CURRENT_SUB_BULLET_POINT;
    62      }
    63  }
    64  close TEXT_OUTLINE;
    65
    66  my $LAST_SLIDE   = $XML_SLIDE_TEMPLATE;
    67  $LAST_SLIDE      =~ s/__SLIDE_NUMBER__/$CURRENT_SLIDE_NUMBER/g;
    68  $LAST_SLIDE      =~ s/__SLIDE_TITLE_GOES_HERE__/$SLIDE_TITLE/g;
    69  $LAST_SLIDE      =~ s/__SLIDE_TEXT_GOES_HERE__/$SLIDE_TEXT/;
    70  $SLIDESHOW_TEXT .= $LAST_SLIDE;
    71
    72  undef $/;
    73  open(XML_TEMPLATE_FILE, "< $ARGV[2]") || die "could not open content XML template $ARGV[1]n";
    74  my $XML_TEMPLATE = <XML_TEMPLATE_FILE>;
    75  close XML_TEMPLATE_FILE;
    76
    77  $XML_TEMPLATE =~ s/__MY_SLIDES_GO_HERE__/$SLIDESHOW_TEXT/;
    78  print $XML_TEMPLATE;
    79  exit;
The first ten lines of ods_gen.pl set up some auxiliary variables. Lines 13 and 17 are the hardest part, at least if you want to customize the script. $ODP_BULLET_POINT is the snippet of XML code which defines one single, first-level bullet point in a slideshow with the base layout shown above. Similarly, line 17 defines a sub-bullet: the way you distinguish one from the other is through the style-name attribute (P3 or P4 in this example). The script loads from external files (lines 23-29 and 72-75) two other XML templates, slide_template.xml for single slides and slideshow_template.xml for the whole document. The middle part, that is lines 33 to 70, is the one which loads the text outline, one line at a time, recognizes the txt2Tags markup and creates the equivalent XML/ODF version.
To understand how it works it’s probably better to start from the end, that is lines 57-62. Line 57 is a Perl regular expression which means “if the current line starts with a space, a dash and then another space, save all the following text into the Perl built-in variable $1”. That variable is then copied to $CURRENT_SUB_BULLET_TEXT. Immediately after, the script copies the XML code for generic sub bullets into $CURRENT_SUB_BULLET_POINT, and replaces the placeholder string inside it (**SUB_BULLET_TEXT_HERE**) with the content of $CURRENT_SUB_BULLET_TEXT. Finally, this shiny sub-bullet is added to $SLIDE_TEXT. Lines 50 to 55 do the same thing with first-level bullets.
The block from line 35 to 48 is a bit more complex because it must do two things. First, like the others, it recognizes the markup for a slide title and saves it into another auxiliary variable. A slide title, however, means that (unless we are at the very beginning, hence the check at line 36) we have a full slide worth of XML, accumulated while parsing the previous line, into $SLIDE_TEXT.
Therefore, before continuing, we have to load the single slide template into $CURRENT_SLIDE and replace the three placeholder strings with, respectively, slide number, slide title and slide content. Once this has been done, we can dump the result into $SLIDESHOW_TEXT and continue. Lines 66 to 70 do the very same thing to add the content of the last slide.
Once the outline has all been converted to XML format and saved into $SLIDESHOW_TEXT, we’re practically done. All is left is to place the content of that variable in place of the **MY_SLIDES_GO_HERE** string inside the complete template (line 77) and print everything to standard output.
And if something isn’t clear…
Try the scripts, and you’ll see that the whole process is simpler than it looks from this explanation, and don’t hesitate to let me know if something isn’t clear!
(the content of this page was originally part of a larger article written for Linux Format)